Create Calculated Measurements
You can enhance your reporting capabilities by using calculated measurements for advanced analytics. Calculated measurements can be created from the monitoring site’s properties panel or from a report.
|
|
 PREREQUISITES:
|
You can create calculated measurements for things like:
|
 EXAMPLE
- Click a monitoring site to open the site details panel.
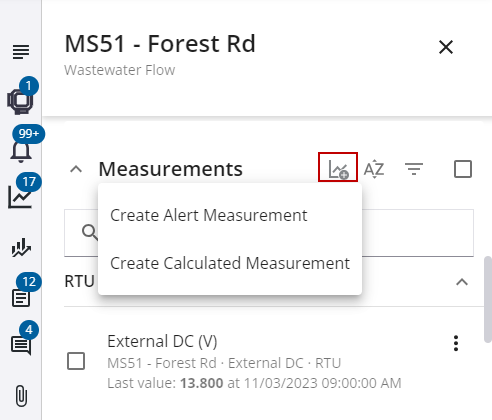
- Click or scroll to the Measurements section.
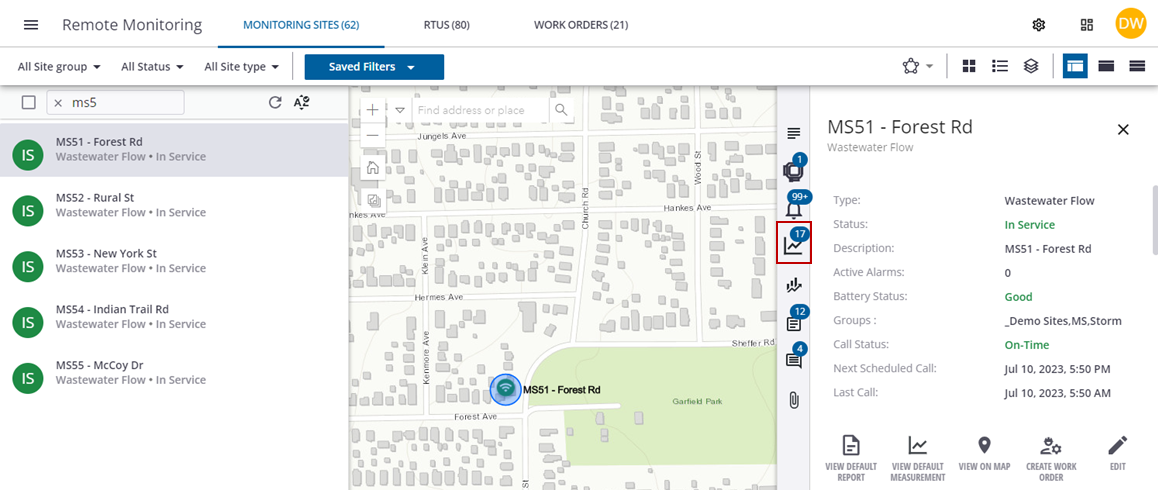
- Click Create Measurement, then click Create Calculated Measurement.
- Enter a name for the calculated measurement. A description is not required, but is helpful in knowing what the calculated measurement does. It is also displayed as a tool tip when using the cursor to hover over the measurement.
- Select a Type of measurement. Depending on the measurement type selected, the Unit and Compress Using fields may automatically populate. These can be changed if needed.
- Click Create Calculation.
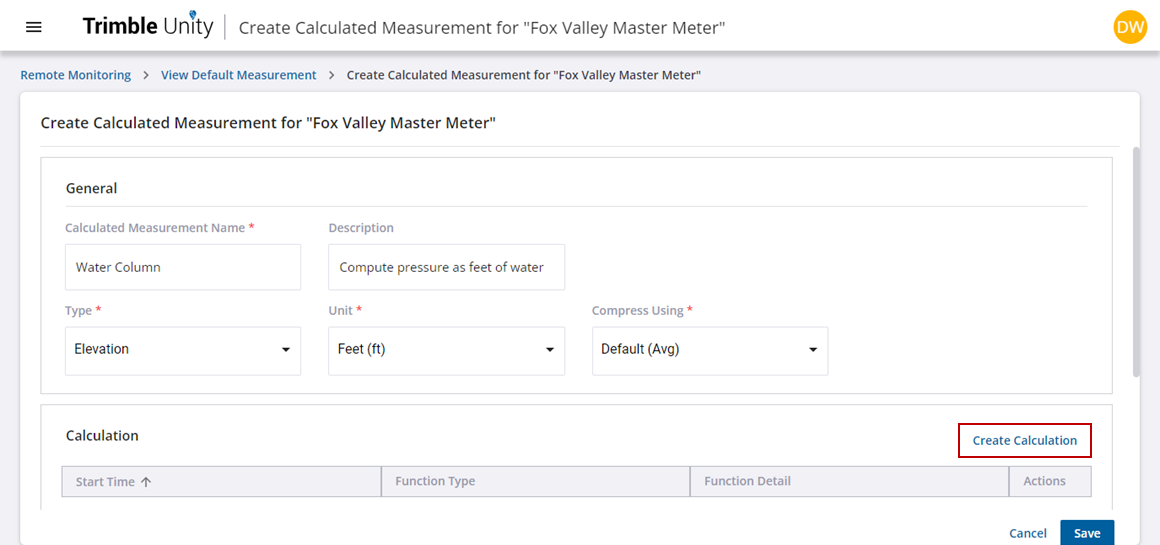
A Create Calculation panel opens and displays a Formula option under the Function Reference section. If you click Formula, more information about what a formula is appears, such as a definition, parameters, and examples on how to use it.
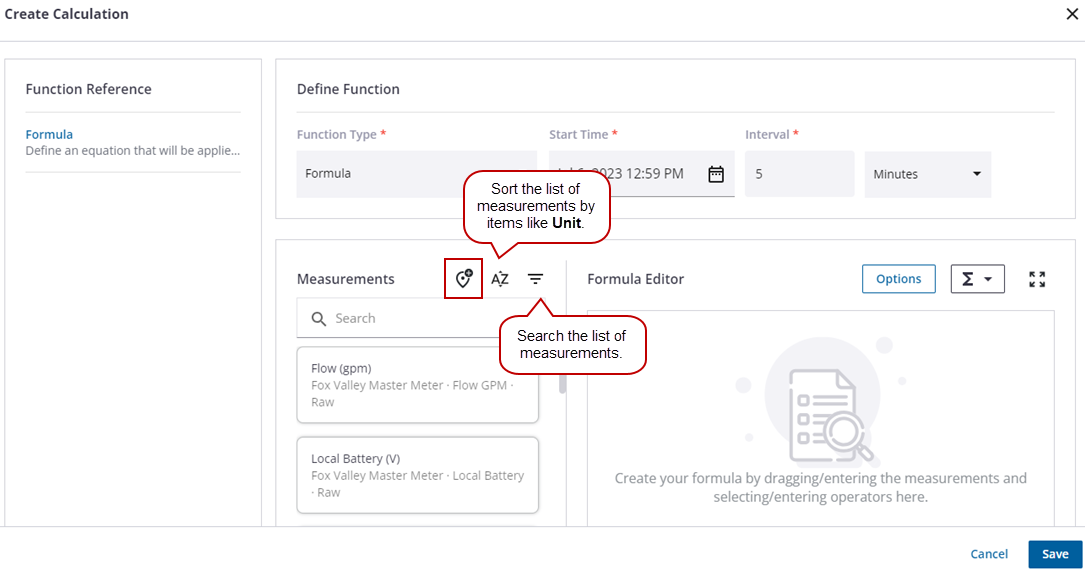
- In the Define Functions section, select the Start Time for when the calculated data will start from.
- Specify an Interval length, which must be between 1 minute and 24 hours. For the best results, the interval length should match the data interval of the measurements referenced in the calculation or be a multiple of that interval.

Now that you've defined your functions, you need to create the calculated measurement formula. The Measurements section displays all the measurements available for the selected site. You can search and sort the list for specific measurements, as well as add additional sites to the list.
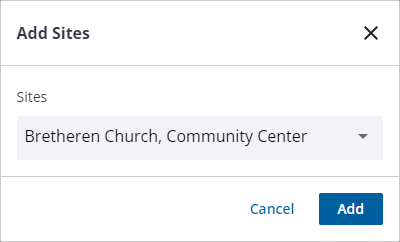
- To add a site, click Add Sites.
- Select a site or sites from the Sites drop-down list and click Add. Any measurements available in the site(s) you added will appear in the list in the Measurements section.
- To create a formula:
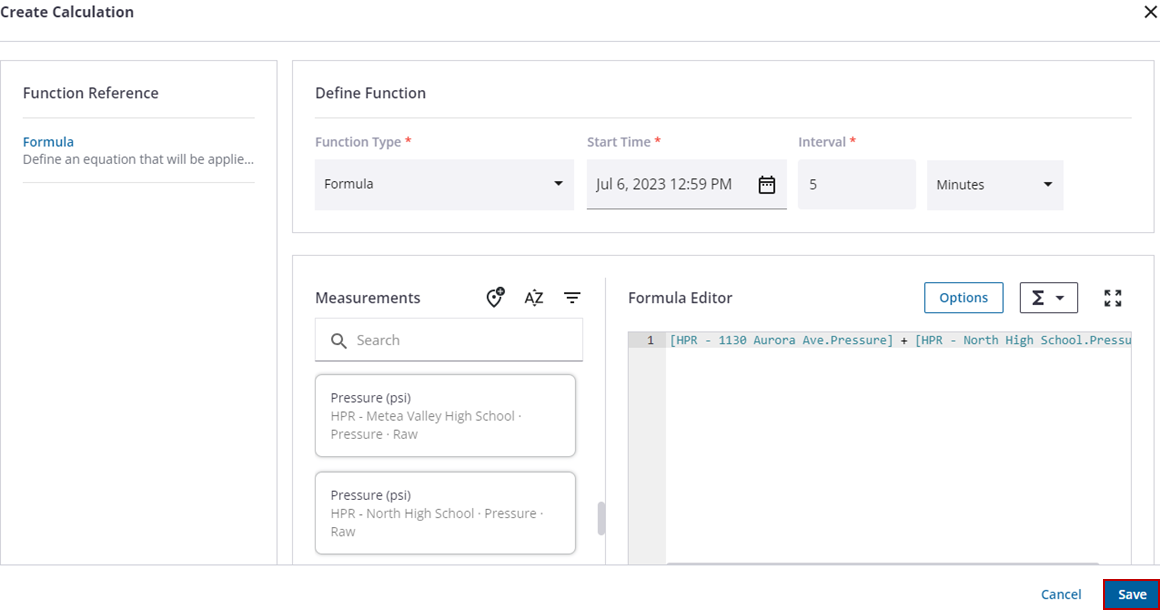
- Drag and drop a measurement from the Measurements section to the Formula Editor or start manually entering your formula in the editor. It is important that square brackets [ ] encompass the site name and measurement or just the measurement name when referencing siblings (measurements that are part of the same site). As you enter manually, the editor will filter suggestions based on the site and measurements available. Use a period to separate names when both the site and measurement are used.
- Add a period after the measurement name to present an additional list of options. These include Min (interval minimum), Avg (interval average), Max (interval maximum), and Interval (interval length in seconds). If no option is specified, Avg will be used.
- Enter an operator either manually in the editor or using the operator list and then another measurement or other data required by the selected operator. This will tell your calculation what to do with each of the measurements.
- Add parentheses to control the order of operations when necessary.
 BEST PRACTICE: Expand the Formula Editor view when working with very long calculated measurements to make it easier to view. Press the Esc key on your keyboard to exit the expanded formula view.
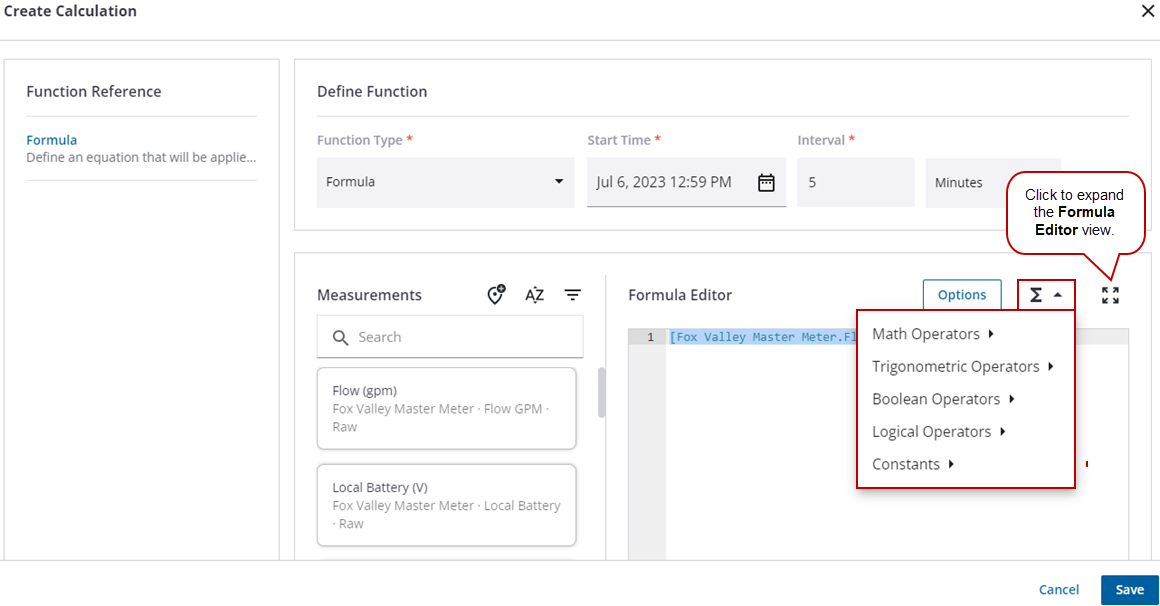
- Click Options.
- Select Use zero for Null or missing data to substitute zero for missing data to ensure that the absence of data does not result in a Null return value for the calculation.
- Select Store Null results as Zero to save null values to the database and have the ability to edit it later with a specific value. If this is not selected, the null value is not saved and you will not be able to edit the resulting data gap later on.
- Once you have created your calculation, click Save.
 NOTE: If there are any errors, a red X will appear on the line where the error occurs. Hover over it to find out what is needed to fix the error.
You can create as many subsequent calculations that you may need as well as edit or remove any existing ones. When you create additional calculations they must start on different dates and times than the other calculations in the list. Each calculation will take effect on the start date it is given and remain in effect until the next calculation's start date.
NOTE: If the STOP command is used in a formula, all calculations will stop at that time. This may be used when you only need certain data for a short period of time or you don't want the calculation to continue.
- Click Save to save the calculated measurement. This will create the measurement and start the calculation(s).
An icon appears next to the new measurement in the Measurements panel notifying you that the calculation is running. If you are actively viewing the measurement, a message will appear letting you know the calculation has completed and will ask if you want to refresh the report to show the latest data for the measurement.
NOTE: Min and max values are not available for calculated measurements.
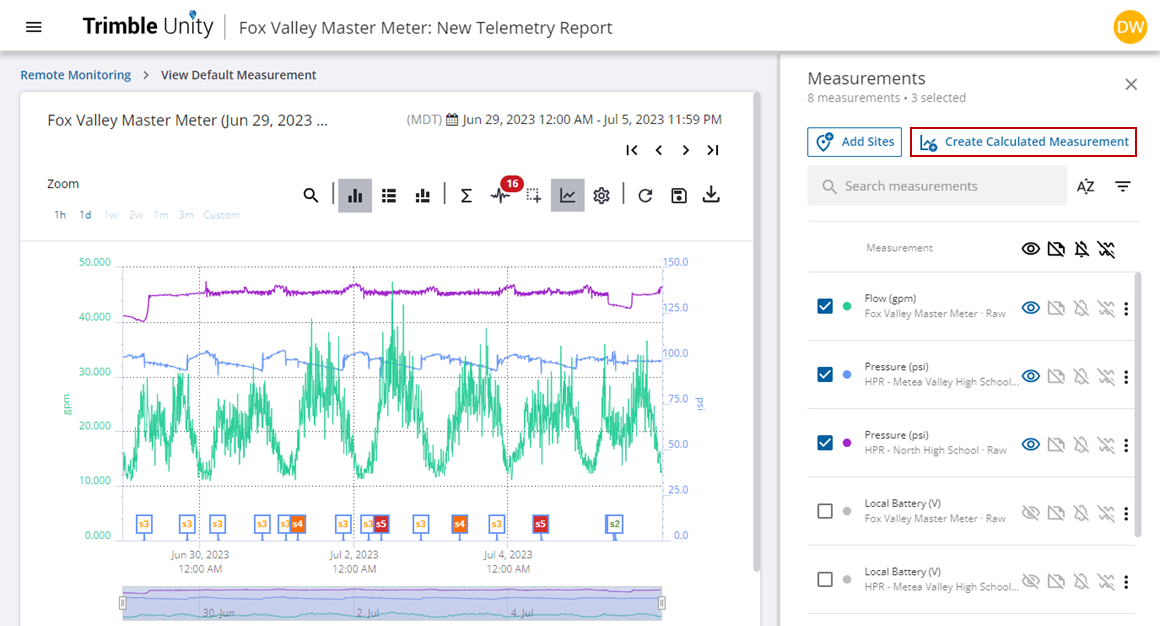
- Open a telemetry report to create a calculated measurement.
- Click View Measurements to open the Measurements panel.
- Click Create Measurement, then click Create Calculated Measurement.
- Enter a name for the calculated measurement. A description is not required, but is helpful in knowing what the calculated measurement does. It is also displayed as a tool tip when using the cursor to hover over the measurement.
- Select a Type of measurement. Depending on the measurement type selected, the Unit and Compress Using fields may automatically populate. These can be changed if needed.
- Click Create Calculation.
A Create Calculation panel opens and displays a Formula option under the Function Reference section. If you click Formula, more information about what a formula is appears, such as a definition, parameters, and examples on how to use it.
- In the Define Functions section, select the Start Time for when the calculated data will start from.
- Specify an Interval length, which must be between 1 minute and 24 hours. For the best results, the interval length should match the data interval of the measurements referenced in the calculation or be a multiple of that interval.
Now that you've defined your functions, you need to create the calculated measurement formula. The Measurements section displays all the measurements available for the selected site. You can search and sort the list for specific measurements, as well as add additional sites to the list.
- To add a site, click Add Sites.
- Select a site or sites from the Sites drop-down list and click Add. Any measurements available in the site(s) you added will appear in the list in the Measurements section.
- To create a formula:
- Drag and drop a measurement from the Measurements section to the Formula Editor or start manually entering your formula in the editor. It is important that square brackets [ ] encompass the site name and measurement or just the measurement name when referencing siblings (measurements that are part of the same site). As you enter manually, the editor will filter suggestions based on the site and measurements available. Use a period to separate names when both the site and measurement are used.
- Add a period after the measurement name to present an additional list of options. These include Min (interval minimum), Avg (interval average), Max (interval maximum), and Interval (interval length in seconds). If no option is specified, Avg will be used.
- Enter an operator either manually in the editor or using the operator list and then another measurement or other data required by the selected operator. This will tell your calculation what to do with each of the measurements.
- Add parentheses to control the order of operations when necessary.
BEST PRACTICE: Expand the Formula Editor view when working with very long calculated measurements to make it easier to view. Press the Esc key on your keyboard to exit the expanded formula view.
- Click Options.
- Select Use zero for Null or missing data to substitute zero for missing data to ensure that the absence of data does not result in a Null return value for the calculation.
- Select Store Null results as Zero to save null values to the database and have the ability to edit it later with a specific value. If this is not selected, the null value is not saved and you will not be able to edit the resulting data gap later on.
- Once you have created your calculation, click Save.
NOTE: If there are any errors, a red X will appear on the line where the error occurs. Hover over it to find out what is needed to fix the error.
You can create as many subsequent calculations that you may need as well as edit or remove any existing ones. When you create additional calculations they must start on different dates and times than the other calculations in the list. Each calculation will take effect on the start date it is given and remain in effect until the next calculation's start date.
NOTE: If the STOP command is used in a formula, all calculations will stop at that time. This may be used when you only need certain data for a short period of time or you don't want the calculation to continue.
- Click Save to save the calculated measurement. This will create the measurement and start the calculation(s).
An icon appears next to the new measurement in the Measurements panel notifying you that the calculation is running. If you are actively viewing the measurement, a message will appear letting you know the calculation has completed and will ask if you want to refresh the report to show the latest data for the measurement.
NOTE: Min and max values are not available for calculated measurements.
For more information on valid operators, see the Appendix 1: Formula Reference appendix.